On December 16th, I did a Gilded Age inspired session with Laci Neal. The inspiration for the shoot was a mix of the show “The Gilded Age” and historical photos of Mrs. Astor and Mrs. Vanderbilt from the 1880s.
For this session, I used:
|
Photography Equipment |
Props/Miscellaneous |
|
Cannon R6 24-105 mm Lens Transmitter/Trigger 2 Phottix strobes 2 c-stands 1 Backdrop stand 1 canvas backdrop Sandbags 1 rectangular softbox 6x6 silver reflector Light stand Bell reflector with grid Boom arm Clamps Tablet clamp |
Flower arrangements Chair Flower stand Wine glass Hand mirror Opera Glasses Tiny purse
|
The set up
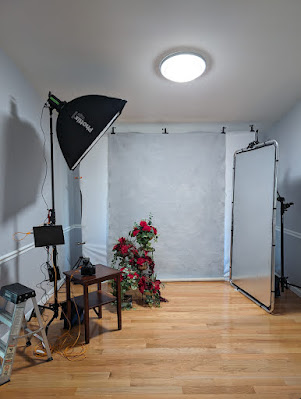
For this session, I wanted to channel the images of the heiresses of the American Gilded Age, specifically images of Mrs. Astor and Mrs. Vanderbilt. From these images I gathered they were either taken in their sprawling mansions or simplified photo studios. One thing that was consistent throughout the images were large flower arrangements, ornate chairs, and simplified backgrounds. So, for my images, I went for a hand-painted canvas backdrop in grey and large red floral arrangements in large gold goblets on a three-tiered flower stand. I also brought in a chair for a few of the images; however, the chair I had wasn’t of the right era.
For lighting, I tried to keep things simple. To my left I placed a rectangular softbox, which was perpendicular to the large 6x6 silver reflector to my right. I raised the softbox up and tilted it to somewhere between 30-45 degrees down towards the subject while ensuring light bounced off the reflector for fill. This helped create directional light and keep nice shadows. I also added a second light with a bell reflector and grid to my right for some of the images to reduce the shadows further.
 |
| Basic Set Up |
I also want to note that I have figured out why my strobes kept losing sync when the R6 is tethered to my laptop. It comes down to the USB-C connector and the camera software, which does something strange to the communications. To solve the problem, I have to convert the USB-C to a USB-A, so the camera doesn’t send a charging request to the laptop. Hopefully, Canon will issue a software update and fix the issue; until then, I have a workaround.
Camera Settings
For this session, I used ISO 100, with an aperture
of F8 and a shutter speed of 1/200s. These are my standard settings for studio
portraits. My focal length ranged from
24mm to 80mm, with my most common focal length being 35mm.
The Photos
This session was fun, but working with Laci is always fun because she brings so much personality to the shoot. This first image is one of my favorites and uses the chair prop to provide a regal feel. The first thing I did was adjust the white balance and bring up the exposure by one stop. I tend to shoot a little dark just to have a little wiggle room. I then used a medium contract tone curve, and adjusted the sharpening and luminance. I then placed a small radial gradient on the model’s face to brighten it just a tad. I then adjusted the color by bringing down the reds, yellows, and oranges to make a nice skin tone. I then added a Green (shadow) / Blue (highlight) color grade with a 10-percent saturation level to the image. I went with the green/blue grade because I like how it affected the background and how the blue interacted with the skin tone, giving the image a cooler yet vintage feel. I then cropped the image and added a medium vignette.
This next image is basically a copy of the images from the gilded age time period. I think I got fairly close to the lighting in the reference photos. As you can see, I went with soft lighting for the image. I followed all the basic steps from the first image except for adding the color grade. I like this photo due to the expression on Laci’s face, which is that perfect high society, “I’m silently judging you” look.
I like this image because it is a perfect portrait and could easily be seen as a portrait hanging in those gilded mansions of New York, if it was an oil painting. I also like the expression here because it says, “I’m rich and a power player in society, so don’t cross me.” I did all the same steps as in the earlier image but only adjusted the exposure by ¾ of stop. I also up the clarity slightly.
This last image is of the back of the dress and adds a touch of mirror work. The dresses of the time period could have very elaborate bustles, thus I felt it was important to show the back of the dress and train. To add interest to the image we used the little hand mirror angling it and myself so I could capture the model’s profile while just a fraction of the front of her face. I completed all the same action as in previous images, however in this case I also added a radial gradient on the image in the mirror to highlight the reflection.
I enjoyed doing this shoot, but I’m also a sucker for elaborate gowns. I liked drawing inspiration from historical images of the time period, as it helped direct my lighting choices and simplify the set design. I also liked that these images rely more on the person and dress than the background, yet still are able to exude emotion. You can see the whole set here: Gilded Age.
Credits:
Model: Laci Neal (IG: @laci.neil)
Set Design: Heather of Munchkin Photos (Instagram: @munckin_photos_by_heather)


Comments
Post a Comment