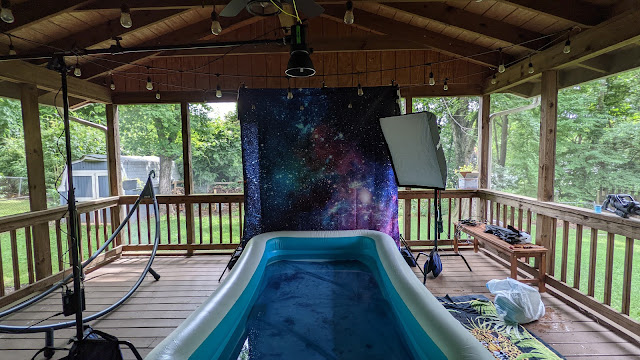
On July 10th I did a water session with the lovely Ayla. This session was designed around the opening credits of the anime Black Clover, were the character Noelle Silva reaches out of the water (0:38/1:44). While the overall set design and photo concept was easy, the lighting set up was challenging part.
For this session I used:
|
Photography Equipment |
Props/Miscellaneous |
|
Cannon 80D Trigger 2 strobes 2 c-stands 1 boom arm 1 Backdrop stands Black backdrop Blue backdrop Star Backdrop Sandbags 1 dome reflector 1 rectangular soft box 1 strip box 1 light stand 1 speedlight Blue gels |
120x60 inch inflatable pool Water 6 bricks Paracord Ladder Bubble Gun |
The set up
When I do a water shoot, I become very concerned about safety, because water and electricity do not mix. So, it was very important things were grounded, sandbagged, and secured in place.
Let’s talk about the pool first. The pool is a large inflatable kiddie pool, that we place on top of work out mats, on screened in porch. I placed a blue backdrop in the bottom of the pool weighted down by six bricks along the edges. The pool was only filled with water to a depth of about 12 inches. Just enough water to lightly float in.
Now for the lights. I first placed a backdrop stand with a black backdrop
at the edge of the pool furthest from the edge of the house, to block the sun. I then placed a star backdrop over that for any standing images. (Note: I do these sessions on a screened in porch attached to the back of my house.) I then placed a c-stand with a boom arm to my
left. Attached to the boom arm was a
strobe, with a dome reflector attached to make a spot of light directly in the
center of the pool. While the boom arm and
C-stand were properly sandbagged, the strobe was also secured, they have
handles, directly to a roof beam using paracord. This ensured the light directly over the pool wouldn’t
go anywhere, and there were no single points of failure. I then placed a second c-stand to my right at
the far corn of the pool. This stand contained a strobe in a square soft box
with a grid to act as fill. I then
placed one more light stand on my right along the side of the pool. This stand had
a strip box, with speed light with a blue gel, and was used to add color to the
shadows and meet the color of the reference image.
 |
| Taken at end of session, strip light moved so model could exit pool. |
Camera Settings
For this session I used ISO 100 and an aperture of F8. I used F8 to ensure a decent depth of field, and ensure focus. I used two distinct shutter speeds 1/200s and 1/250s. My focal length ranged from 18mm to 60mm with most of the images being taken at 28mm.
The Photos
Pool sessions can be
challenging for both the model and the photographer. They are challenging for
the model because they must pose laying on their back and slightly floating. Also,
because the model’s head is partially in the water, they have a hard time
hearing any direction given by the photographer. These sessions are challenging for the
photographer, because the photographer must be cognizant of reflections of any
light equipment and glare. Plus are usually limited in shooting positions because
they want to be up high to shoot down towards the model. Even with these challenges it is worth it to
get the shot.
My favorite image from
this session was taken very early in the session. In this image I’m obviously shooting down
from a ladder. The strobe directly above the pool provided the light to the
model’s face, and the strobe at the corner of the pool added some fill. The gelled
speed light at the side of the pool added a blue cast to the image. The image
straight out of camera was all blue, so I went in and white balanced the image,
to reduce the amount of blue resulting in the color in the final image. I then did
standard edits and added a touch more light to the model’s face. I then cloned out any pool edges in the image,
and added a bit of a vignette. I then added a water ripple image overlay to the
image to add a bit more texture to the image. While the base image had slight
water ripples they were not pronounced, so I added some to add to the feeling
of floating in water. I also ensure none were on the parts of the model not in
the water, to make it seem as natural as possible.
This next image is my version
of the original reference image. Again,
I’m shooting down from the top of a ladder. But in this instance, I turned down
the power of the blue fill speed light and turned up the power of the strobe
over the center of the pool. The water ripples in this image are natural
ripples and were created by having my assistant gently kick the side of the pool. And because the pool is a rectangle it
matched the rectangular ripples seen in the reference image. I did basic edits on this image, cloned out
any visible pool edges and used a dark vignette on the image.
Overall, I felt this was
a good session. I always find water sessions fun yet challenging.
Credits:
Cosplayer: Ayla (Instagram: @geekbellydance)


Comments
Post a Comment