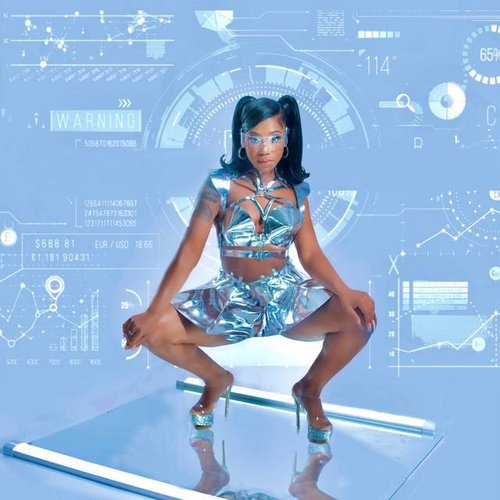
On March 20th I did a session with Kazzy. I drew my inspiration for this session from the color silver, Barbarella promotional photos, as well as still images from Rakiyah – Whoa music video, and 1950’s and 1960’s B-SyFy movies.
For this session I used:
|
Photography Equipment |
Props/Miscellaneous |
|
Cannon 80D Trigger 2 strobes 2 c-stands 1 Backdrop stands Silver vinal backdrop White backdrop Backdrop clamps Sandbags 1-square soft box 7-foot umbrella with sock Grids Magenta & Blue Gels 2-speedlights |
18-inch-tall wooden cube 24-inch-tall wooden cube 18-inch tall styrofoam triangle Holographic plastic table cloths Bubble Gun Light-up glasses Guitar (provide by model) Tape |
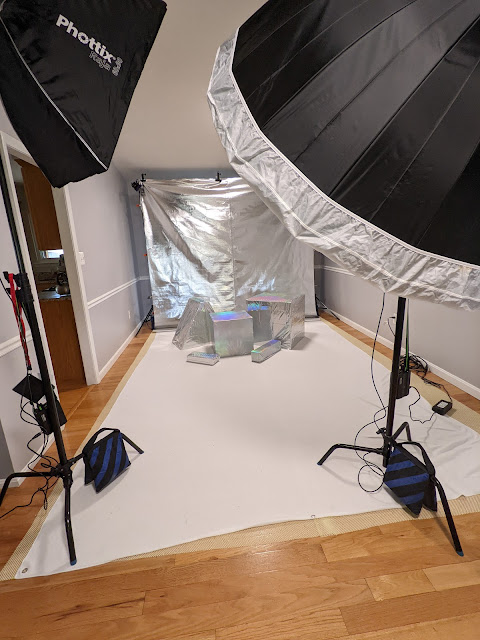
To get the right mood
for this shoot I first hung a white backdrop which covered the floor, then hung
a silver backdrop over that. I knew as
soon as I hung the silver up, the whole set would become very reflective and
the lighting would need to be very controlled. I choose to use one square soft
box with a grids and a large 7-foot umbrella for fill. To add dimension to the
image I also placed gelled speed lights at the top of each backdrop stands
angled towards the background but still providing a kiss of color to the
model. From there I added the set pieces
which were cubes covered in holographic table plastic cloths, to add to the syfy/futuristic
feel.
Now for the actual photo
session. For this session I used an ISO 100 with an aperture of F8, with a
shutter speed of 1/250s for 82-percent of the images. I went to ISO 400 with an aperture of F5 and
a shutter speed of 1/100 for a very specific images where I was trying to
capture the glow from the light up glasses. My focal length ranged from 18mm to 135mm with
28mm being the most common focal length.
One of my favorite
images from the session is with the bubble gun because you can see the bubbles,
and I just like the overall vibe of the image. (I painted the bubble gun
silver, the day before the shoot, so it would blend in.) The reason you can see
the bubbles is because they are lit from the side, by the speed lights at the
top of the backdrop stand poles. I also like this image because you can see the
mix of magenta and blue in the image creating the nice double shadows on the
floor. When I post processed this image, I added a bit of light to the models
face, and added a vignette. I did pull the image into Photoshop to use a neural
filter and the liquify tool to smooth out some lumps in the skirt.

I like this next image
just because it is simple and has that bit of futures vibe. Again, you can see
the dual shadows due to the gelled speed lights. In this case the main light is
coming from the strobe to my left with the strobe to the right providing fill.
I did modify this image in during post. I did basic edits in Lightroom, then added
a bit of light to the face and a light vignette. I find the vignette helps pull
out the colors at the edge of the background. I then processed the image in
Photoshop using the neural filter and the liquify tool. I used the liquify tool to smooth out the
back and stomach areas slightly, to reduce bulges created by the tightness of
the top and the skirt. I want to note
the model is perfectly well proportioned and pretty, but sometimes cloths do
weird things and create rolls when they shouldn’t no matter what size the model
is.

This last shot took work
to get. To capture the glow from the glasses I had drop all my settings and
just go with kisses of light from the strobes and speedlights. To get the shot
I first tested setting without the flashes firing until the glasses showed up,
I then brought in one speedlight and one strobe at very low powers. My final
settings were ISO of 400 with an aperture of F5.6 and a shutter speed of
1/100s. You can see the blue gelled speed light is providing a lot of the light
for the image while the strobe is providing just enough light to ensure the
models face isn’t blue and completely in shadow. The pink from the glasses is a nice contrast
to the blue. During post processing I did basic adjustments really working on
the final exposure and contrast for the image. I also added a bit more light to
the model’s face and finished with a light vignette.

I’m happy with how the
session turned out, but I think I can improve it in some areas namely the
aiming of the gelled speed lights. It was a fun little session and I plan doing
it again in the future. You can see the full set from this session here: Silver
This session also made the cover of Over Magazine.
Credits:
Comments
Post a Comment