On March 20th
I did a session with Tony. I
drew my inspiration for this session from the color silver and a few futuristic
fashion posts on Pinterest.
For this session I used:
|
Photography Equipment |
Props/Miscellaneous |
|
Cannon 80D Trigger 2 strobes 2 c-stands 1 Backdrop stands Silver vinal backdrop White backdrop Sandbags 2-square soft boxes Grids Green/aqua gels 2-speedlights |
18-inch-tall wooden cube 24-inch-tall wooden cube 18-inch tall styrofoam triangle Holographic plastic table cloths Bubble Gun Light-up glasses Tape
|
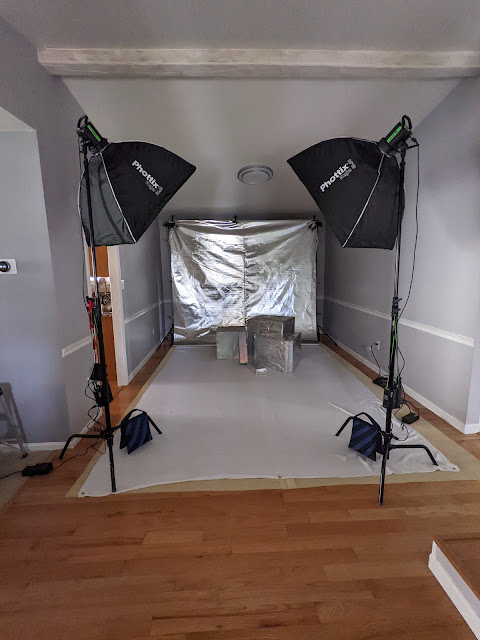
To get the right mood for this shoot I first hung a white backdrop which covered the floor, then hung a silver backdrop over that. I knew as soon as I hung the silver up, the whole set would become very reflective and the light would need to be very controlled. I choose to use two square soft boxes with grids to be able to control the light hitting my model and set pieces. To add dimension to the image I also placed gelled speed lights at the top of each backdrop stands angled towards the background but still providing a kiss of color to the model. From there I added the set pieces which were cubes covered in holographic table plastic cloths, to add to the syfy/futuristic feel.
|
|
 |
| Lighting Set up |
Now for the actual photo
session. For this session I used three different ISOs 100, 200 and 400, with
most shots taken at ISO 200. I also used
three distinct apertures, F5, F8, and F9 with F9 being the most common. I used a shutter speed of 1/100s for most of
the images with a few being images being taken at 1/250s. My focal length ranged from 20mm to 120mm with
most of the images take at 50mm.
This first image is one
of my favorite images from the session, just because of the lighting and
overall tone of the image. To get this image
I relied mainly on the two gelled speed lights mounted at the top of each end
of the backdrop stand, which created a bit of a short light scenario. (Short
light is where the subject is lit from the side of their face that is farthest
from the camera.) As you can see, I’m getting nice wash of colored light across
the image from the speedlights. I only
had one of my strobes on, and at very low power to ensure I didn’t washout the
color being provided by the gelled speedlights.
Because I was at such low power levels on the flashes and strobe, I was
able to pick up the glow from the light up glasses and light up sneakers. I was
able to capture all the colors in camera and did not have to use any post
processing techniques such as color grading or selective color enhancement to
get the look. In post I did do a bit of
touch up such as adjusting exposure and contrast slightly. I also brightened the
model’s face slightly with to ensure the eye is drawn there. I also add a very slight vignette on the image
to finalize it.
 |
| ISO 200, Aperture F5, Shutter 1/100s, Focal Length 50mm |
In this next image I’m
also relying on the gelled speed lights but I have fill coming in from one of
my strobes to light the front of the model. The gelled speedlights provide just
that touch of color and interest to the image. I feel the lighting gives the
image just a touch of the high-tech dystopian vibe. In post I balanced the
image and used some of Adobe’s neural filters to clean up the image. I finished with a light vignette.
 |
| ISO 200, Aperture F9, Shutter 1/100s, Focal Length 120mm |
I’m going to close with
this last image just because it is a fun image. It is hard to look tough when
you are holding a bubble gun, but my model tried his hardest. Bubbles just bring a smile to your face even
big tough guys. The lighting for this image was fairly straight forward, the gelled
speed lights provided accent lights around the edges of the model and to the
bubbles to make them show up. The speed lights also provided the overall color
tone to the image. The two strobes were at a low setting just enough to light
the model but not blow out the color coming from the gelled speedlights. In
post I balanced the image and added a bit more light to the model’s face. I also cleaned up a few distractions like
strings and zipper pulls. I then finished the image off with a vignette.
 |
| ISO 200, Aperture F9, Shutter 1/100s, Focal Length 50mm |
During this session, I
shot four outfits, that the model brought with him based on the mood board I shared
with him. I do all my mood boards via Pintrest,
as I find it is a good way to keep myself focused and show the model and MUA, if
one is involved, the overall vibe I’m going for. But I can tell you four outfits is too many
for me to shoot in one session; I could tell I was getting tired at the end and
just running out of creative steam. Overall though the shoot was successful and
I got the images I was hoping for. You can see all the final images from this shoot
here: Futuristic
Menswear.
Credits:
Comments
Post a Comment