
Smoke Machine Test

ISO 100, Aperture F5, Shutter 1/15s, Focal Length 24mm

In early January I received the Smoke Genie which I kickstarted last year. The Smoke Genie is a small handheld smoke machine that is about the size of 20oz bottle of pop. I always wanted a smoke machine but a lot of the ones I have seen have been too large and can’t provide the type of control I would want.  Now I have worked with dry ice and you can’t really control that, but if I was going to invest in a smoke machine, I wanted to ensure it was controllable, met a variety of needs, and small to be able to easily store it.  The Smoke Genie met all those needs and is really designed for the small creative, not the DJ trying to make haze at the club or the big movie production team with budget to spare.   Only bad part is it doesn’t ship with batteries, so I had order batteries before I could use it.  So last weekend I finally had the batteries and a chance to test it out these are the results.

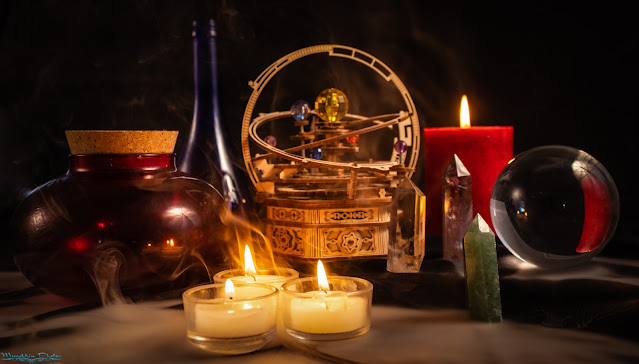
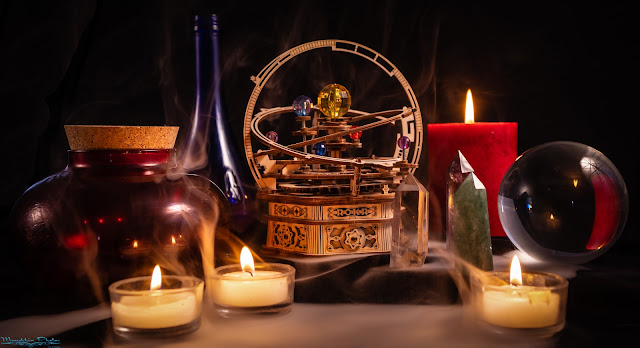
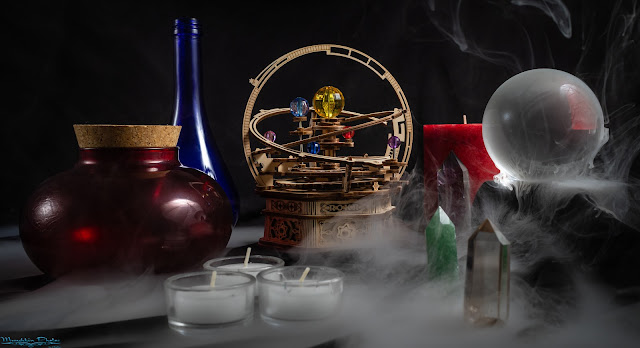
 To test the Smoke Genie, I set up a small still life set using a table, a black backdrop, a speed light with an umbrella, a light stand, a reflector, CTO gel, and some items from around the house. I went for something that could be a bit mystical and ended up with a bit of alchemist desk.  I did a variety of shots both with and without the smoke so I had a comparison. I also used two different attachments for the smoke machine, the want which allows you to precisely lay smoke and for lack of a better term the sponge which makes the smoke look a little closer to what you would get from dry ice.   Overall, I liked how the smoke hung and lingered, however the sponge attachment did make it look like dry ice smoke but it was quick to dissipate.  This could have been to the fact I was running an air purifier in the room, thus creating an air current so more testing might be needed.  I will say the smoke created from its fog juice did not have any noticeable smell, unlike the sweet-smelling smoke from the fog juice for other machines.  In conclusion I do see myself using this as a tool for some of my sessions and as away to expand my creativity.  Below are a few of the fully edited sample images.

ISO 100, Aperture F5, Shutter 1/15s, Focal Length 24mm

ISO 100, Aperture F8, Shutter 1/160s, Focal Length 24mm


Comments

Popular posts from this blog

The Pumpkin Barron

On October 12th, I had the pleasure of working with the marvelous SunnyRae .   The general theme for the shoot was pumpkins but with coordination on outfits with SunnyRae theme evolved into official portraits of an 18 th century Pumpkin Baron. For this session, I used: Photography Equipment Props/Miscellaneous Cannon R6 24-105 mm Lens Transmitter/Trigger 2 Phottix Strobe 1 Westcott Strobe 1 rectangular soft box 1 strip box 1 6x6 silver reflector 2 C-stands 1 light stand Boom arm Color checker clamps Sandbags Backdrop stand Rough canvas backdrop Pumpkins Rough canvas drop cloth Flowers Old trunk Books Letters Wooden crate Fake leaves Chair Tri-level plant stand     The set up I wanted to keep this set up a bit rustic yet give the feel of staged aristocratic painting of the time.  I started with a plain rough canvas backdrop then placed an ol...

Night Queen

On September 28th, I did a session with May.   This session’s theme was designed around a Halloween headpiece I made a couple of years ago but never got to shoot.   The vibe of the overall shoot was dark queen. For this session, I used: Photography Equipment Props/Miscellaneous Cannon R6 24-105 mm Lens Transmitter/Trigger 2 Phottix Strobe 2 rectangular soft boxes grids 2 C-stands Sandbags Backdrop stand Fuzzy grey backdrop Spyder Color Checker Card A-clamps 2 trilevel plant stands Fake candles Goblets Fake flowers Black fabric Silver fabric Large Styrofoam block Dowel Rods Skulls Fake moss Dry ice   The set up I tried to keep this setup simple in nature.  I started with the base of a fuzzy grey backdrop to which I added a “throne” made from a large Styrofoam block, some dowel rods, and a piece of black fabric.  To that I added two flower pot hol...

Belle Island with Central VA Cosplayers

On October 19 th I drove down to Richmond, VA to attend a Central VA Cosplay Photoshoot meetup on October 20 th at Belle Island.   I wanted to go to this event because it was in an interesting location, and I wanted to meet some new cosplayers.   For this session I used: Canon R6 2 Speed light Trigger 1 Light stands 24 - 105mm lens Gels Camera Settings: For this shoot, I was transitioning back and forth between being inside an old, dark, abandoned building to bright, sunny woods.  Due to the transitions, my settings varied greatly.  I mostly shot at ISO 100 except for when I accidently bumped the nob to “Auto” and didn’t notice, so I also took shots at ISO 2500, 3200, 4000, and 6400.  The shots at the high ISO actually look fairly decent, and not as grainy as one would expect.  My shutter varied between 1/100s to 1/250s with the most common shutter speed being 1/250s.  My aperture varied between F5 to F11 with the most common ap...