On January 29th, I did a pregnancy announcement session thecullimoreclan. They chose to not do a traditional announcement session that was all lovey-dovey but went with a fun and playful space theme to include costumes. This was the first pregnancy announcement session I have ever done, I usually don’t do sessions like this, since my work usually leans a little more towards fine art then traditional family portraiture. But there is always a first time for everything.
For this session I used:
|
Photography Equipment |
Props/Miscellaneous |
|
Cannon 80D 18-200mm lens Trigger 1 strobe 2 speedlight 1 c-stands 1 Backdrop stand A-clamps Sandbags 1 strip box Grey backdrop Galaxy backdrop |
Large Foam Triangle Foam Squares Bowls
|
The inspiration for the
session was provided by the couple, as they indicated the center of their universe
was about to change. They provided the
galaxy backdrop and their own outfits. I did suggest to them instead of going
with balloons with the date, to go with a flag similar to a moon landing, since
I was going to make the set look floor resemble a moon to go with backdrop. Additionally,
to prepare for this session I went through both pregnancy announcement photos
and space inspired photos to come up with some posing ideas and how to best do
lighting for the session.
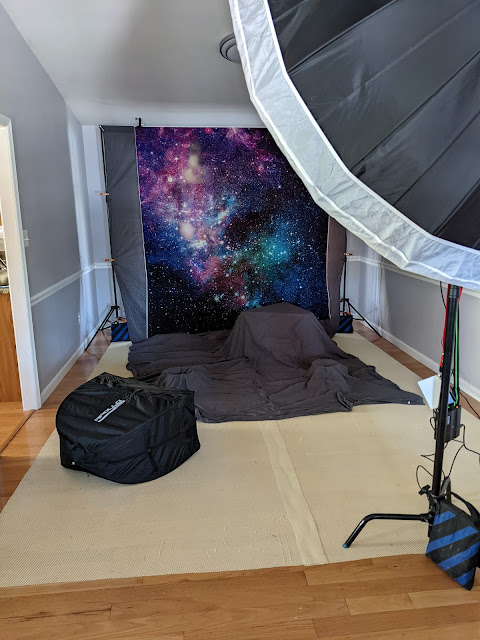
The lighting for this
set was rather simple. The main light
was coming from a strobe about 10-degrees off center to my right, which had a
7-foot umbrella with a sock on it. This light was at about ½ power throughout
the whole session and light the scene with a nice even soft light. I used this option since I would be working
with a couple and wanted to ensure they were both evenly lit with no hotspots.
I did also have a small strip box on the floor opposite the strobe to add some
contrast to the floor. I wanted to ensure the floor had some texture, since I
placed foam blocks and bowls down covered by a grey backdrop to create the
feeling of a moonscape and not just have a flat boring floor. You can see this set up below.
Now for the actual photo
session. For this session I used an ISO of 100 and an aperture of F9, with a
shutter speed of 1/160s. I wanted to
ensure everything was in focus so went with a higher F-stop. My focal length
ranged from 24mm to 90mm with 32mm and 35mm being the most common focal lengths.
I did keep these images a bit wide so I could ensure both people were in the
image, and had some room to crop to standard sizes.
Since the lighting for
these images was the same across every frame, I edited them all the same way.
The only changes were how I cropped the images. For each image I balanced the
exposure, went in an added some highlights to the couples faces, did a little
bit of photoshop to clean up any small blemishes and extend the backdrop in a
few images, and then finished with my standard vignette.
The two images below are
my two favorites from the session because they are fun. I think they really capture the couple’s personality.


Comments
Post a Comment