On December 4th, I did a styled holiday session with ViNa. This session was all about fun, cuteness, and candy; thus, demanded to be a high key session.
For this session I used:
|
Photography Equipment |
Props/Miscellaneous |
|
Cannon 80D Trigger 2 strobes 1 speedlight 2 c-stands 1 Backdrop stands 2 light stands 2 u-hooks Painter pole Red Seamless A-clamps Sandbags 1 7-foot umbrella 1 Beauty Dish 1 Bell Reflector 1 30-degree Grid |
24-inch square wooden posing box 18-inch square wooden posing box Red wrapping paper Red & White striped wrapping paper Empty boxes Red and silver ornaments Red and gold ribbon Fake miniature pine trees Large fake candy canes Fake suckers Clear plastic display stands Tape Headpiece |
I got my inspiration for
this set and session from the headpiece itself and several images on Pinterest. Now since I had another holiday session right
before this session, I wanted to take advantage of the previous set pieces and
just incorporate a few additional elements. I stared with the red Savage seamless
background as the base. I turned a large wooden posing box into a present. I
then added the smaller posing box from the previous session to the background
and placed the miniature pine trees on top. I also added silver ornaments to
the painter’s pole to go with the red ones from the previous session. I then
added a few candy canes to the set and some candy ornaments to the trees. I
knew I wanted the headpiece to be the true center of attention so tried to keep
the set simple and on theme. As I worked
through the session, we changed up the set by eliminating items and making it
simpler throughout the shoot.
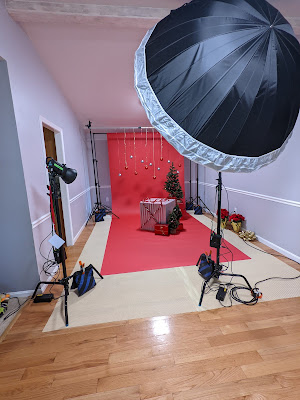
The lighting for this
set was rather simple. The main light
was coming from a strobe about 10-degrees off center to my right, which had a
7-foot umbrella with a sock on it. This light was at about ¼ power throughout
the whole session and light the scene with a nice even soft light. I then had another strobe on boom arm that
was about 45-degrees of center to my left with a beauty dish on it, which acted
as a fill. That one was at about 1/8 power.
This set up gave me a nice high-key commercial look. You can see this set up below. Note the set up shows a bell reflector on the
strobe, I took the picture of the set before doing the lighting test, which
caused me to change out the bell for the beauty dish.
Now for the actual photo
session. For this session I used an ISO of 100 and an aperture of F9, with a
shutter speed of 1/200s. I wanted to
ensure everything was in focus so went with a higher F-stop. My focal length
ranged from 28mm to 130mm with 40mm being the most common focal length. While I normally shoot very wide, the size of
the umbrella made me shoot further away from the subject and zoom so that the
umbrella wasn’t in the shot. For a majority of these photos, I was sitting on
the floor so I was shooting under the edge of the umbrella.
The goal of this shoot
was to stay fun and flirty. Once I put the wig and headpiece on the model with
the tulle dress, I knew exactly what I was going for, which was a very “kawaii” shoot. The outfit with
the wig and headpiece also gave me Lolita fashion vibes,
that is why I went for very cute and playful. My favorite image from the session captures
that fun and flirty feeling. The
lighting was great but I did have to some clean up in post. The first thing I
did was remove some of the ornament strings behind the model’s head because
they were distracting. I then went in
and filled in some gaps in the tulle using a mix of the patch tool and healing
brush. The model was wearing black leggings under the dress so it wasn’t and
issue during the shoot. I just wanted make sure the dress was as fluffy and
filled in as possible. I then went in and lightened the trees, so they wouldn’t
look so dark and bring back some details.
I finished the image off with a very light vignette.

This next image is a
close-up to really focus on the headpiece. For this image I first went in and
did basic edits, then removed the ornament strings behind the model’s head. I
then used a little frequency separation to go in and even out skin tones and remove
any small blemishes. I then used some doge and burn techniques to add some
depth and texture to the tulle. I finished the image off by adding a very
slight vignette to add some additional depth to the image.

This image was one of
the last images we shot. I went very simple with just a box, the ornaments, and
hand-held props. The wooden box is hollow
on the inside and big enough for the model to fit inside. So, I flipped the box
over and the model got inside, so it would look like she was coming out of the
box. I feel like the tulle is reminiscent of a bunch of tissue paper you would
use the pack a present. I did not do a
lot to this image in post, I mostly cleaned up a few spots where you could see
the backdrop stand legs. Then even out skin tone and removed any minor
blemishes. I also used a little bit of dodge and burn to give the tulle some
more dimension. The problem with working with tulle and very even lighting is
sometime you lose the shadows that create the texture in the tulle. I then
finished the image off with a very light vignette.

This final image is just
pure and simple. No distractions so you can focus on the model and headpiece. With the model sitting she was well below the ornaments
so those did not act as a distraction and I removed all the set props except
for one hand held prop. So, I have a nice clean image that could be holiday
album cover art, which is good because the inspiration came from a holiday
album cover. I did basic edits on this
image and used a square crop because it worked best for the image. I then used
a little frequency separation to ensure even skin tones. The used some dodge
and burn to add some texture to the tulle.
I finished the image off with a very light vignette.

Overall, I’m very happy
with how this shoot turned out. I kept it high key, cheery, and cute while
capturing a holiday spirit. The model did an excellent job of staying cute and
happy to really make the images work. A
few of the final photos from the set are expected to be published in WHATever Magazine. You can see the complete set here.
Credits:
Model: ViNa
(Instagram @vhh21)
Comments
Post a Comment