I’m still stuck at home,
just like everybody else. So that means no
models thus more self-portrait work. For
this most recent self-portrait, my inspiration was Roman Empresses and to add a
bit of challenge I used Rembrandt lighting.
 |
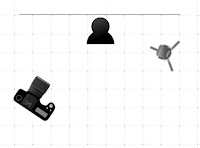
| Light Set Up |
For this shoot the
background was some window blinds and lighting was provided by one 430EXIII-RT
speed light with a Lumiquest soft box attached.
The speed was set at a ¼ power with 24mm zoom. The speed light was
placed on a light stand located 15 degrees left of center and raised above me
and pointed down. The camera which was my Canon 80D with an 18-200mm lens was positions
at 45 degrees right of center and pointed at my face. For this self-portrait
session I used ISO 100, with an aperture of f4.0 and a shutter speed of either
a 1/125s or 1/250s and at focal lengths
of 24mm and 28mm.
There were two challenges
to creating this photo. The first challenge was getting the lighting right and
the second was positioning my head so the lighting would be correct. Rembrandt lighting creates a small triangle
of light opposite the light source and characterized by having the subject nose
create a long shadow across the face that meets the shadow of the cheek. So, while the lights may be in the right position
(I used a protractor and ruler to get the angles right) I had to make sure I
was looking in the proper direction or I would change the lighting effect. If I
looked to much towards the light, I would get light my whole face, if I looked
away from the light too much, I would have side lighting. I ended up shooting 44 frames and only 5 truly
met the definition of Rembrandt lighting. The other interesting thing about the images
is Rembrandt lighting is usually darker and low key, while these shots are bright and closer to high
key.
 |
| ISO 100, Aperture F4, Shutter 1/250s, Focal Length 24mm |
To finalize the images,
I edited them first in Lightroom to do the basic adjustments. I did not do anything fancy in light room. I
basic ensured the color setting was Adobe Portrait, reduced some of the red and
orange tones to even out the skin, and balanced the exposure slightly. Then cropped all the images before sending
them over to Photoshop. In photoshop I
removed my blemishes and smoothed my skin using the frequency separation technique. I also attempted a few edits using Luminar 4
just to compare the edits to photoshop.
I found I like using photoshop more for blemish removal and skin smoothing. I don’t do major beauty retouching on my
images, such as eye enlargement, eyebrow enhancement, and face sliming because
they are higher skill level edits then I’m capable of in photoshop. Luminar allows
me to do those edits with some simple sliders; however, I don’t like doing them
because it can make the image seem unnatural. Also, I believe face slimming and
eye enlargement starts to get into the realm of false beauty standards. I’m all
for removing of blemishes like zits and evening out skin tone because that can
be accomplished with skillfully applied make-up. I realize there are also
tricks to make-up application that can make your face look slimmer and your
eyes look bigger but digitally changing features I believe is a no-no. It is one thing to remove a blemish or get
rid of a stray hair, it is another thing
to completely change a person’s face shape.
Comments
Post a Comment