 |
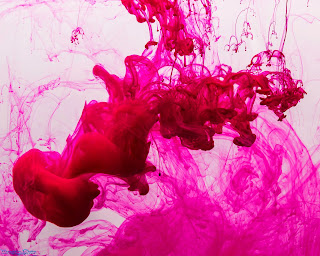
| ISO 100, Aperture F9, Exposure 1/60s, Focal Length 50mm |
Yesterday I worked on taking some ink drop photos. I have
been wanting to try this type of photo out for a while it is similar water drop
photography but a little slower paced.
As a precaution, since things can get messy when working
with water and ink the whole set was placed in my bathroom, specifically the
shower. For this shoot I used the following:
• Step ladder • Canon 80-D
• Fish tank • Radio transmitter for flashes
• 2 light stands • Camera trigger
• Boom arm • Tripod
• 2 speed lights • 18-200mm lens
• Soft box • Water
• 2 colors of ink • White matte board

For the setup I placed the
fish tank on top of the step ladder to raise it to an appropriate shooting
level. Behind the fish tank attached to
the shower wall I hung a piece of white matte board to act as the background
(my shower is an off-white color). Then I put one light stand to camera left
and attached a boom arm to it so that I could place a flash with a soft box over
the top of the fish tank. I then placed
a second light stand and flash to the left of the camera at a 45-degree angle
to the front of the fish tank. The
camera was placed on a tripod perpendicular to the front of the fish tank, with
the lens zoomed to only have the front face of the tank in the shot. (See
image on left.) Once everything was in position, I filled the tank with cold
water, and used a nail file point to focus the lens. To take the photos I had a trigger attached
to the camera to activate the shutter, while I shot ink from an eyedropper into
the water.
I shot all the frames at ISO
100. I shot 136 frames at an aperture of
F9 and 25 frames at F5.6. I shot most of
the frames at F9 to ensure depth of field and sharp focus across the image. I shot 136 frames at 1/60s which was a mistake
since this was a moving object, so even though I was using flash there is still
some motion blur. I shot 25 frames at 1/200s. My focal length ranged from 35mm to 190mm with
127 frames shot at 50mm. I shot a total
of 161 frames and kept 50 frames to edit.
I edited the images first in
lightroom to correct white balance, do some basic edits, and cropping. I then
pulled the images into Photoshop to apply a curves layer and adjust some of the
shadows and highlights. Below are a few
of the images from the session.
 |
| ISO 100, Aperture F9, Exposure 1/60s, Focal Length 50mm |
 |
| ISO 100, Aperture F5.6, Exposure 1/200s, Focal Length 130mm |
 |
| ISO 100, Aperture F9, Exposure 1/60s, Focal Length 50mm |
 |
| ISO 100, Aperture F9, Exposure 1/60s, Focal Length 50mm |
I like how most of the images
turned out, however if I do this again, I will need to make improvements to the
set up. In the raw images some of the
shadows and creases were lost due to the lighting, thus I would change the
lighting so there are two soft boxes, one on each side of the fish tank instead
of one above and one to the side. Second,
and most importantly I would increase my shutter speed to really freeze the motion
in the image and get a sharper more defined lines. Finally, I would use a few additional colors. But overall, for the first time taking this
type of photograph, the images are respectable.
Comments
Post a Comment