
Headshots and Tulips


Since all of Ohio is on a stay at home order currently,  I thought I would update my headshot and take some photos of the potted tulips my husband bought me. 

Lighting Set Up
I used the same set up for both my headshot and tulip photos.  For these shots I was sitting on our couch or had the tulips sitting on the couch.  I placed a speed light with a small umbrella on a light stand to the camera’s right pointed at the subject.  When I was shooting myself, the center of the umbrella was slightly above the center of my face with a slight downward angle. For the tulips I angled the light down towards them, since they sat lower than me on the couch. The flash was set to a 35mm zoom and  1/4 power. I also had a silver reflector on the camera’s left to reflect some light to reduce the hard shadows.  (See image to left.) I used a Canon 80D, with 18-200 mm lens and a cable trigger. 

I shot myself portraits and the tulips at ISO 100. For myself portraits, I used two focal lengths 18mm and 32mm, an aperture of F5 and a shutter speed of 1/125s.  I shot 35 frames and kept 15 images, and then did full editing on 5 of the images.  For the Tulips, my focal length varied between 40mm and 120m.  I used two apertures F5 and F9,  with most of the images being shot at F9. I also used two shutter speeds 1/100s and 1/125s, with most of the images being shot at 1/125s.  I shot a total of 47 frames and kept 14 and edited all 14 frames. 

Below you will see two standard headshots. Each one was shot at F5 at 1/125s and a focal length of 32MM.  The only thing adjusted during the three photos was the reflector and the way I was sitting. I also took the opportunity in post processing to work on my retouching.  I used the frequency separation to smooth out my skin and remove a few blemishes. I then went back in and used the dodge/burn tool to accentuate a few of the highlights and shadows.  


The tulip photos are more interesting, because I shot these in a low-key fashion to ensure I was getting rid of the couch cushions as a background.   Also, I feel the yellow really pops against the darkness. For this shot I used the setup described above and move the camera closer and slightly above the flowers while zooming to 80mm.  When editing the photo, I used the Adobe Vivid color setting and did my normal edits.  


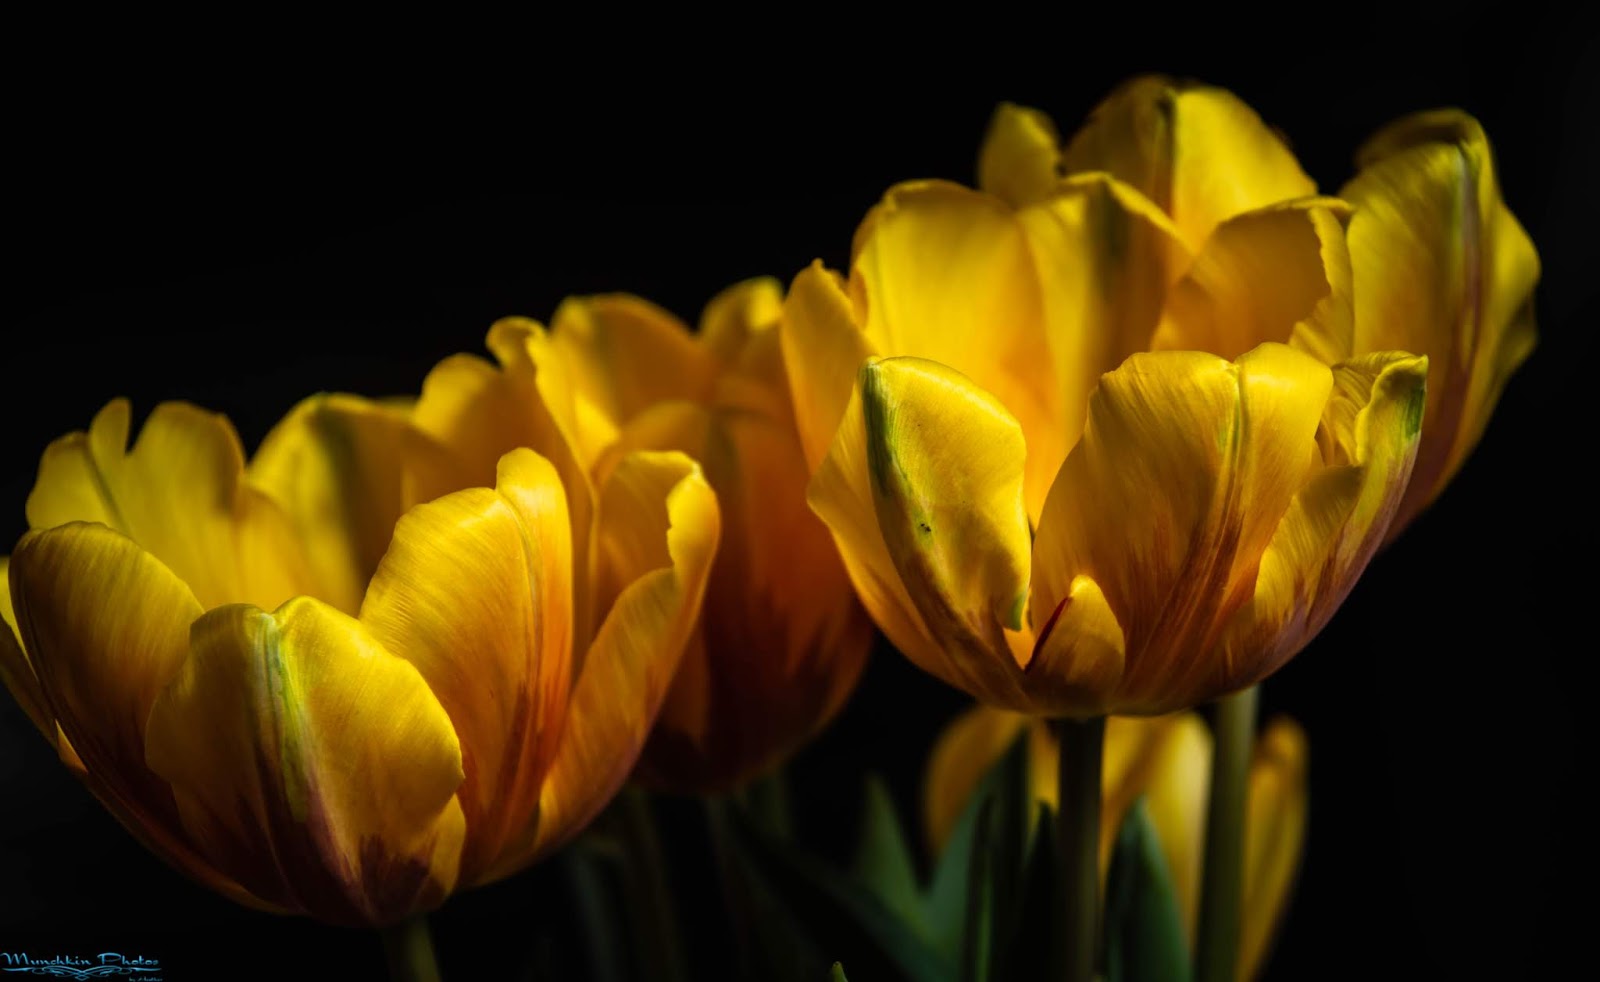
For this second tulip shot I had a flash laying next to the flower pot with the head angled up towards the reflector which I moved behind the flowers instead of at the side.  This is what is causing the bit of inner glow in the flowers.  This image was shot at 40mm at F9 with a shutter speed of 1/125s.  The flashes were set at ¼ powers.  


Comments

Popular posts from this blog

Cobwebs Everywhere

On October 7 th , I did a studio spooky session with Coralinx Cosplay .   The central theme of this shoot was a pretty goth girl who had a fondness for spiders and decorating with cobwebs, making it a perfect Halloween session.   Note: Cobwebs are defined as abandoned or old spiderwebs that have collected dust.   Many cobwebs are the result of comb-footed spider (i.e., black widows) that make irregularly shaped webs.   Spiderwebs are active structures built to catch prey.   (Source: Western Exterminator Company) For these sessions, I used: Photography Equipment Other Equipment Cannon R6 24-105 mm Lens Transmitter/Trigger 2 Westcott FJ400 2 Phottix Strobes 2 strip boxes 2 rectangular soft boxes 2 c-stands 3 light stands Backdrop stand Black seamless 2 Westcott silicon gels Tether cable Laptop Laptop holder Sandbags A-clamps Spyder Color checker Fake cobwebs Table ...

2025 Year in Review and Looking Forward to 2026

This year was a bit interesting especially since during the day, I’m a government employee, which resulted in a lot of stress and a 42-day furlough.  I didn’t attend as many cosplay events with the D.C Cosplay group, now Costume and Camera, as I normally would have, due to schedule conflicts.  However, I traveled up to Poughkeepsie, New York for two photo events, one of which I was a featured photographer.  I attended two conventions, one of which didn’t turn out as expected and the other just confirmed my decision to take a break from it.  Though happily I did a lot of studio work this year, which I enjoyed.  But on the other hand, I lost my dear “studio supervisor”, my dog Teddy.  He liked to great clients and then “supervise” while lying/sleeping in his bed. I also started to work on the business side of my photography work, by investing in a Customer Relationship Management (CRM) site to manage bookings, schedules, and payments. No more trying to juggle...

Spooky in the Morning

On October 5 th , I did an on-location spooky session with Rebecca at Claude Moore Park.   The theme was Victorian ghost; however, it is hard to be a ghost at 9:30 in the morning on a bright sunny day.   I did my best to get a spooky look. For these sessions, I used: Photography Equipment Other Equipment Cannon R6 24-105 mm Lens Transmitter/Trigger 2 Cannon Speed lights 1 30-inch umbrella Light stand Assistant Smoke Genie The setup The set up was relatively easy.  I mounted a Canon speed light on a light stand with an umbrella.  My assistant then held the light in the appropriate spots as we made our way around the park to different locations. Camera Settings This session was held outdoors in bright morning sun and was intended to look spooky, so I tried to keep the images dark.  Thus, I used ISO 100, which is great for sunny conditions.  I wanted to maintain a soft background as much a...