Two weeks ago, I participated in the DC Cosplay Photo Shoots Group meet up at Pierce Mill Park in DC.
The theme for this cosplay meet up was horror; however, the meet up was
in the middle of the day on a bright sunshiny day. Even though the sky was not conducive to
getting those dark, creepy shots; however, the cosplayers were great and I made
the location work for me to get the shots.
For this shoot, I was using a Cannon 70D with an 18-200 mm
lens, and a 430EX II speedlight mounted on a painters poll triggered with a
Young Nu radio trigger. (Thank you to my
husband who acted as my voice activated light stand) I did not use an umbrella,
because I wanted hard, harsh light to get that creepy horror look. Because it was such a bright day, was using ISO 100, and stopped down my aperture to F10, used varied
my shutter speed based on the amount of light, and had my flash in high-speed
sync mode. I did vary my flash power,
but was mostly ran it at ½ to ¼ power.
I had several favorite shots, but I’ll only discuss three.
The first is the Jeckel/Hyde photo. This
photo was shot in the shade, at ISO 100, aperture F10, shutter 1/60s, focal
length 20.00mm. The flash was pointed up
from the ground to the left of the model and was at ½ power. On the original picture, I did basic edits to
include adjusting colorcast, contrast, sharpness, correct camera distortion,
and cropping. I then used a few presets
to darken the photo and added a square vignette.
 |
| Original |
 |
| Final Jeckel/Hyde Cosplayer: Lady O Cosplay |
This photo I absolutely love, because it looks like a high
fashion shot. While the photo does not
convey creepy horror, I feel it conveys classic gothic horror and high
society. While the cosplayer was doing a
spider with fangs, I feel she is embodying a modern vampire and not one of
those silly sparkly ones. This photo was
shot in the shade, at ISO 400, aperture F16, shutter 1/100s, focal length
20.00mm. The flash was pointed down to
the left of the model and was at ½ power.
On the original picture, I did basic edits to include adjusting colorcast,
contrast, sharpness, correct camera distortion, and cropping. I then used a few presets to darken the photo
and added a square vignette. I also did a black and white version of the photo,
but find I like the color one better.
 |
| Original |
 |
| Final Image of Sophisticated Spider |
 |
| Black & White Version |
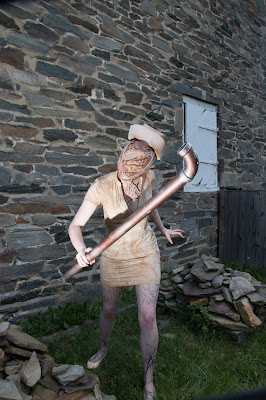
Finally, it would not be a cosplay horror shoot if there
wasn’t someone cosplaying from Silent Hill. This photo was shot in the shade, at ISO 400,
aperture F10, shutter 1/250s, focal length 20.00mm. The flash was pointed up and to the left of
the model and was at ½ power. On the original
picture, I did basic edits to include adjusting colorcast, contrast, sharpness,
correct camera distortion, and cropping.
I then used a few presets to darken the photo and added a square vignette.
I also tried to give this photo a bit
more of red/brown cast similar to what is seen in the video game. For those who think there should be more
blood to be Silent Hill, you can’t splatter fake blood around a park.
 |
| Original |
 |
| Final Image of Nurse from Silent Hill Cosplayer: DVS Cosplay |
Overall, I’m happy with how these photos came out. I’m happy I was able to capture the horror theme even though the setting was the complete opposite with a clear blue sky and bright sunshine. You can see all the photos from the shoot here. You can also follow my work on Facebook here.
Comments
Post a Comment